Are you thinking of getting a car stereo receiver? In that case, the Pioneer AVH 120Bt is the perfect pick for you. You can quickly get the best experience with lots of multimedia functionalities. It’s also excellent for an entry-level unit. The only trouble is with the Pioneer AVH wiring diagram.
You will need an exemplary wiring diagram to properly install this unit in your car stereo system. Even though it can seem a pretty daunting task, in the beginning, you can quickly get through the installation with an exemplary wiring diagram. Maintaining the color-coding of the wires and wiring adapters is a crucial step. And then, you can move on with the connection itself.
Since this is a technical issue, I suggest going into detail about this receiver wiring. Here, I will be going through the whole process, so this can be your all-in-one guide.
Contents
The process of Pioneer AVH wiring with diagram
You must deal with some installation procedures when working with car stereo receivers. It can sometimes get tricky, especially when you do not know the whole thing. It would be best if you went through this wiring diagram for the Pioneer AVH receiver. This way, you can install the unit properly on your system.
So, let’s get on with how you can approach this whole thing.
Installing the Pioneer AVH with proper wiring
When installing a car stereo receiver, you will come across three basic steps to get that job done. These three steps should help you install the whole thing properly on your stereo system. Let’s get through the steps very quickly.
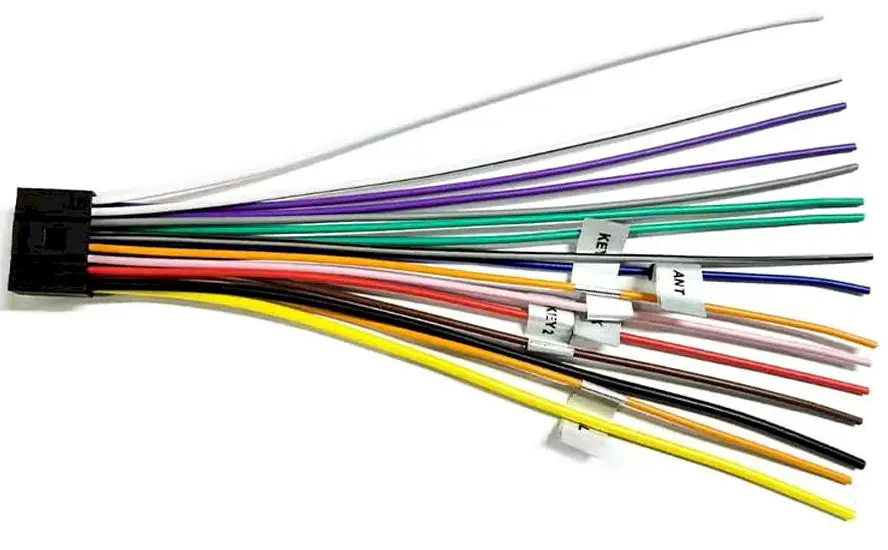
Step -1: Choosing the wiring adapter
The first thing you have to do with the installation is that you have to find the perfect wiring adapter. In the case of the Pioneer AVH 120BT, there is a special kind of adapter available. This adapter will allow you to properly install your stereo receiver unit into the car’s electronic system.
A wiring adapter is simple; it will help your system retain as many OEM functionalities as possible. While doing that also keeps your car’s stereo system’s components safe. So, it makes the process much more valuable and safer at the same time.
Step -2: Color coding and wiring
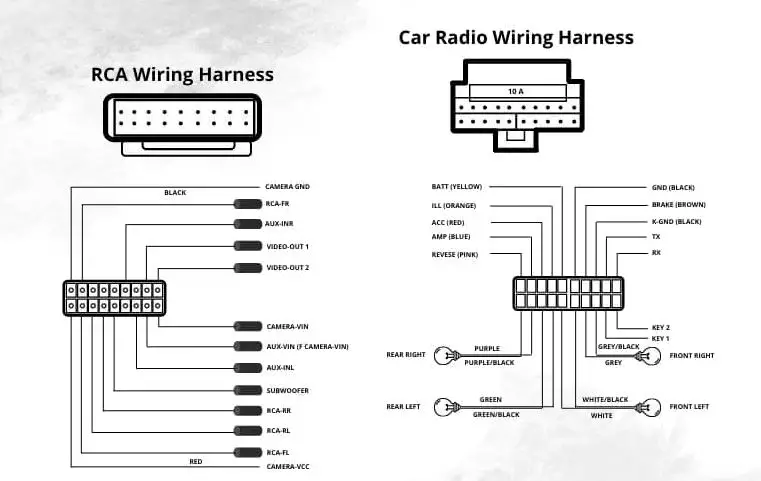
This step requires a lot of your attention, and you must emphasize it. In this step, your main goal is to connect the receiver system’s wiring harness to your chosen adapter. There are several color codes that you have to maintain for better safety and security in the connections.
In this process, the first thing to determine is the color codes necessary for your particular application. Luckily, the Pioneer AVH has a pretty straightforward wiring harness procedure.
Let’s check out the different color codes and what they do so you better understand the wiring later.
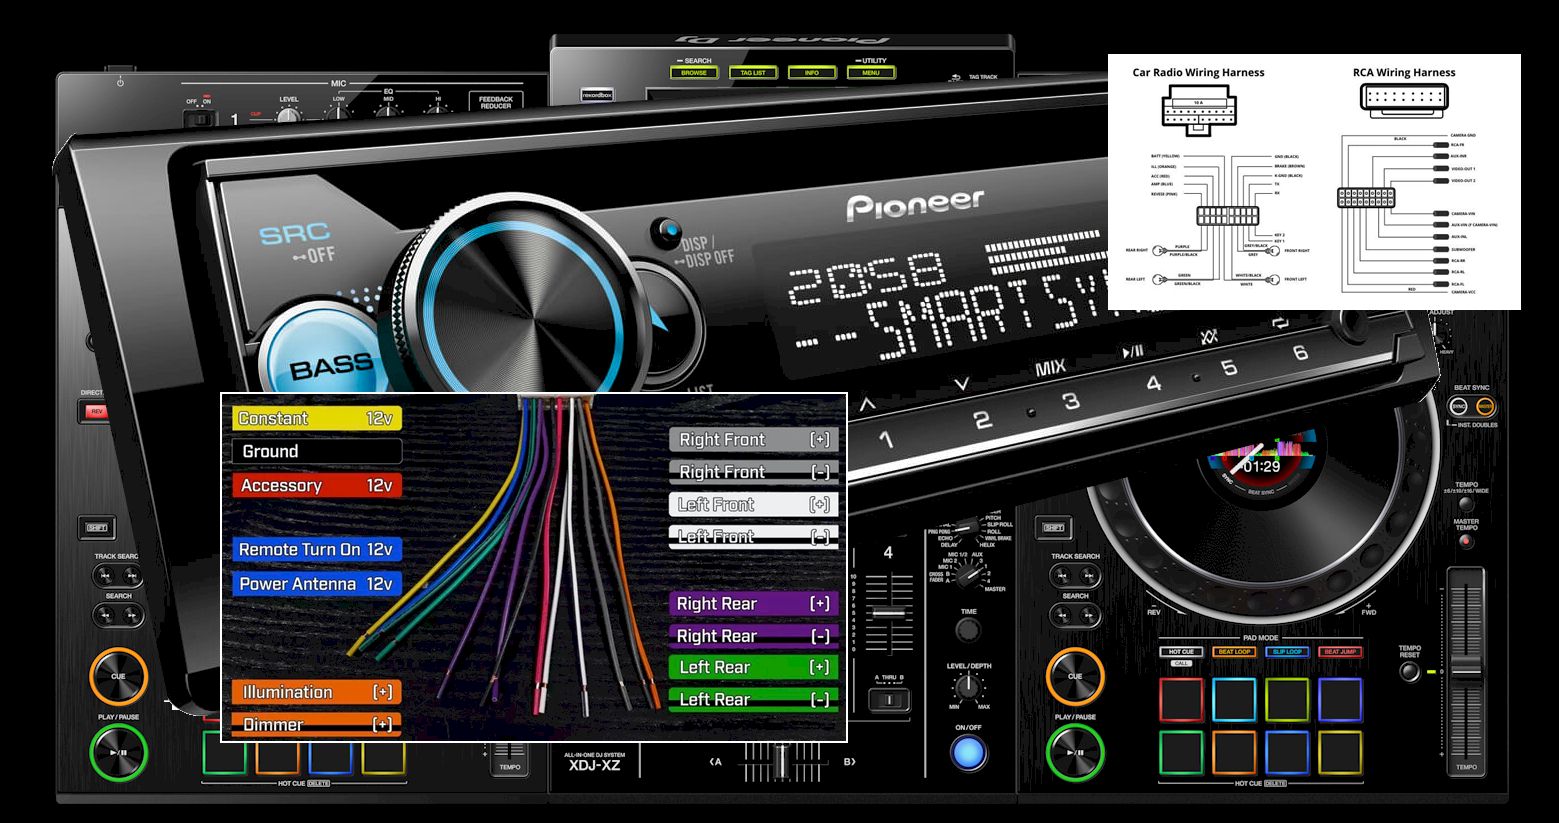
- Yellow wire: The yellow wire you see mostly connects to the battery. It’s responsible for providing power to the unit. It also serves as a memory backup.
- Blue wire: A blue wire in the wiring indicates the trigger mechanism. It means it’s the connection that you have to make to trigger power into the system. It’s like a connection for the switch to this unit.
- Red wire: This wire is similar to the blue one, except it’s the initial trigger. It means the red wire connection is responsible for waking up the unit.
- Black wire: Well, this is the typical ground wire you see in most wiring connections.
- Speaker wires: Aside from these, there are four different speaker wires. The green ones lead to the left rear speaker. The purple goes to the right rear one. You use the white lead for the left front speaker, and the right front channel uses the grey lead.
- Orange: The orange wire is concerned with the lighting or illumination function of the wiring connections.
- Light green wire: This wire is meant for parking brake purposes.
Before installing the unit, always make sure you have checked both the installation manual and the wiring diagram.
Step -3: The connection of the wires
It is the final step where all the connections will happen. This process shouldn’t take too much time or trouble if you have gone through the color-coding discussion above.
All you need to do here is establish the connections with the wiring. First, you cut the wires to their appropriate length to fit on your dash. Then, you have to tape the power wires together. Power wires usually mean the red, black, and yellow ones. It makes the connection secure and easier to execute.
Next up, you must use heat shrink tubes to ensure protection on the wires. Then, you can start soldering the wires for the different connections. For example, you can put all the power wires together in one tube and then solder that to the relevant connections on the unit. You will need to do the same with the speaker leads as well.
You can opt for butt connectors if soldering is too much for you. However, soldering provides a more secure connection, so it’s a better choice.
To finish the whole thing, you can tape your harness and give it a cleaner look. Taping it will also help you tuck the wiring behind the dash. And that’s pretty much it for the complete installation of the stereo receiver unit.
Conclusion
To wrap it up, all I can say is that the Pioneer AVH wiring diagram is not something that will make your life difficult. Understanding the whole wiring mechanism is relatively simple, making the installation process much more manageable. You don’t have to be an expert to understand this wiring.
Also, without the proper wiring diagram, you can never hope to install the Pioneer stereo receiver on your stereo system. So, make sure you are following the appropriate color codes and the proper procedure for installation.

Graduated with a Bachelor of Audio Engineering and Sound Production. He has worked with a number of studios as a Recording Engineer, with over 10 years of servicing experience in both re-recording mixing and sound editing.